Introduction to RV AC fan motor replacement
Hello everyone, I’m Alan Carter Adams, your Appliance Ace! With decades of experience in the appliance repair industry, I’ve seen it all. Today, I want to walk you through an essential upgrade for your RV: the RV AC fan motor replacement. If you’re feeling the heat while out on the open road, you might find that your RV’s air conditioning needs a little boost. That’s where the high-performance RV AC fan motor comes in—a powerhouse replacement that can transform your cooling experience.
Why Upgrade Your RV AC Fan Motor?
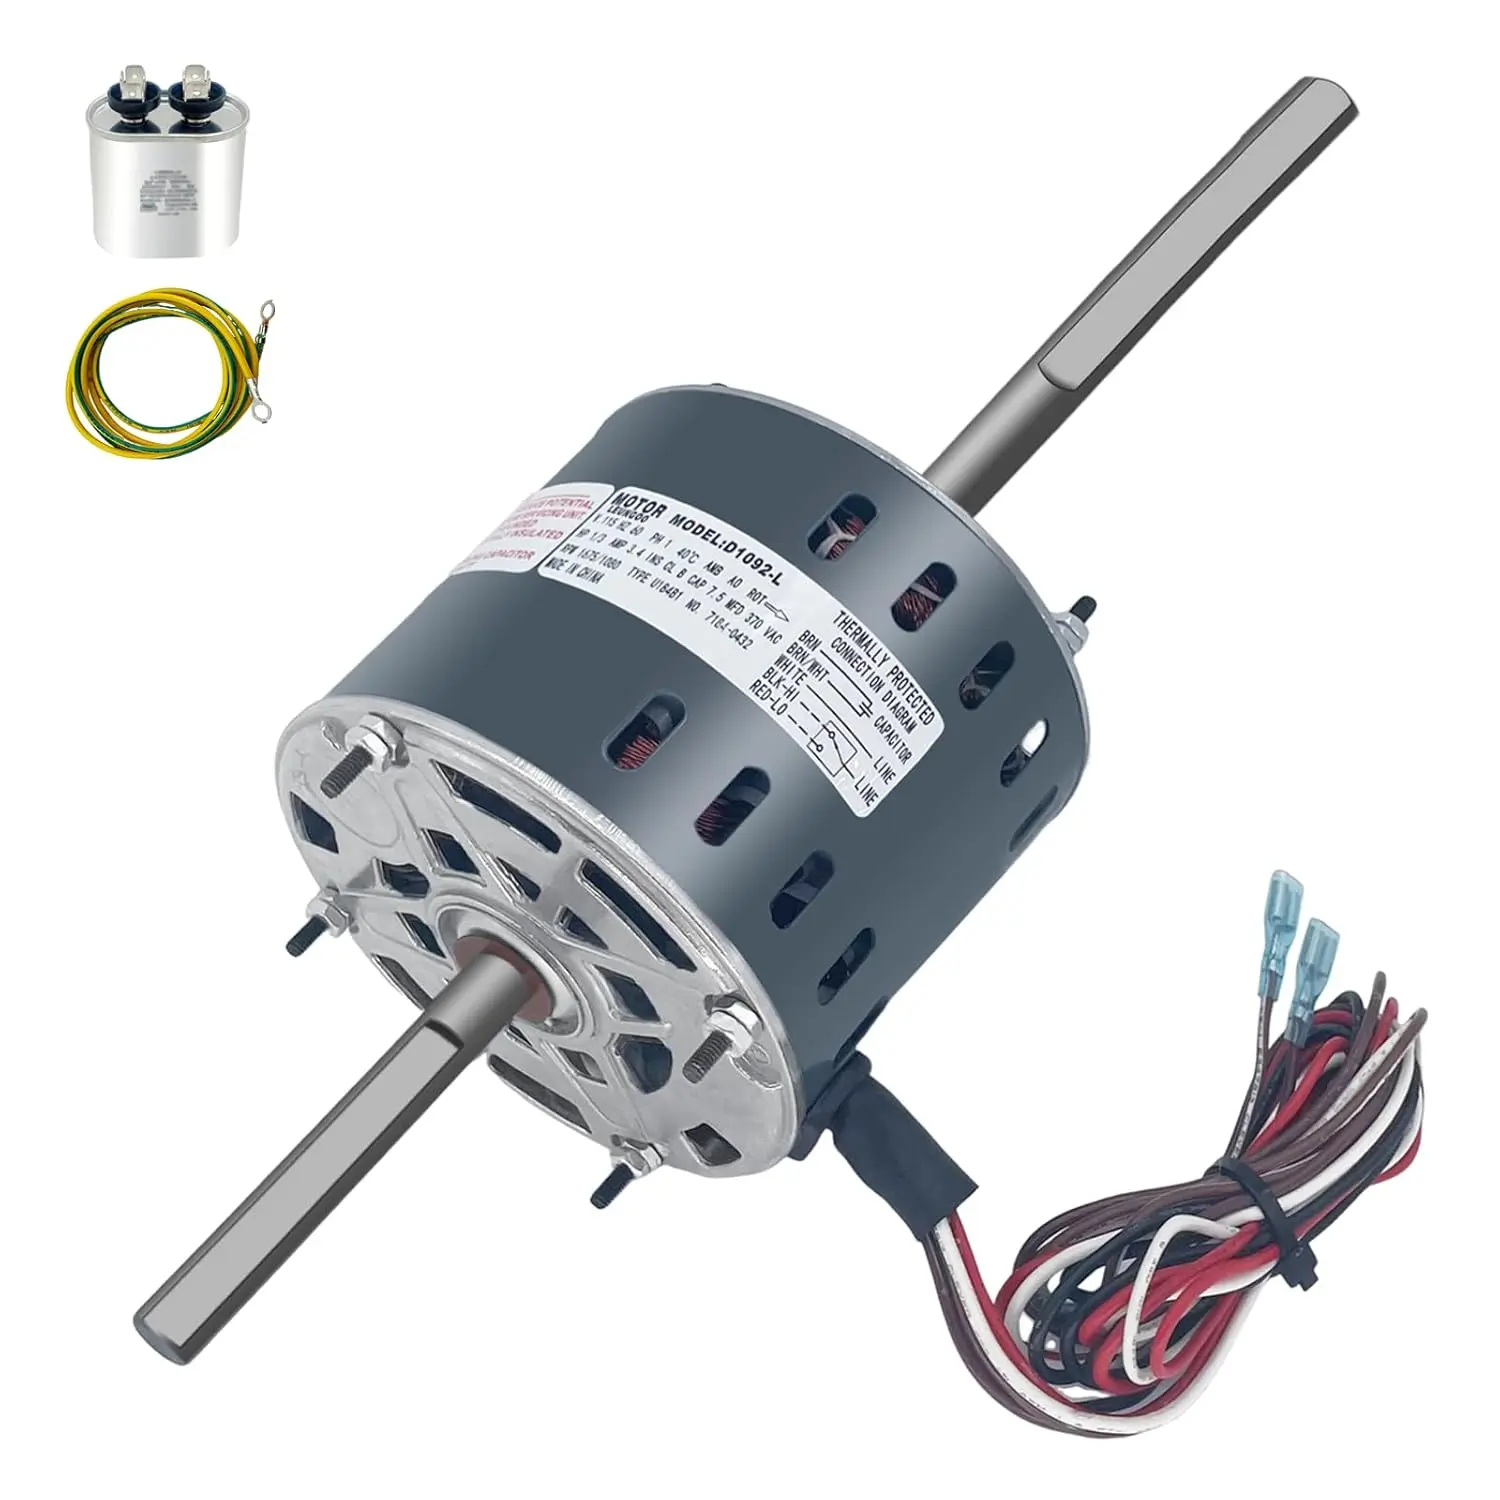
The RV AC fan motor is crucial in ensuring that air flows efficiently through your air conditioning system. A high-performance motor not only enhances cooling efficiency but operates quietly and efficiently, allowing you to enjoy your time on the road without the interruption of noise. This particular motor operates at 1/3HP with dual speeds of 1675/1080 RPM, optimizing your airflow whether you’re parked in a scorching camping ground or traversing sunny highways.
Understanding the Product Features
Let’s dive deeper into what makes this particular motor a standout choice for RVs:
- Dual-Speed Capability: The high-performance motor’s dual-speed operation means you can choose the airflow level that best suits your needs. Running at 1675 RPM is ideal for peak cooling, while 1080 RPM saves energy when full power isn’t necessary.
- Compatibility: This motor is designed to replace several models, making it a versatile option for various RV brands. Specifically, it’s compatible with Fasco D1092 and Coleman Mach units, fitting seamlessly into your existing setup.
- Capacitor Included: With the included 7.5µF/370V capacitor, installation is a breeze. This capacitor enhances electrical operations, ensuring optimal performance from your new fan motor.
- Robust Design: Built to meet OEM standards, this motor is durable and reliable. It fits 6000 and 8000 Series Coleman AC units perfectly, including models like 48004 and 48014.
Preparing for the Installation
Before you begin the RV AC fan motor replacement process, ensure you have the following tools: a screwdriver, a socket set, and wire cutters. Also, don’t forget your safety goggles! Safety first!
Step 1: Turn Off Power
Begin by turning off all power to your RV’s air conditioning unit. Locate the circuit breaker and shut it off, so there’s no chance of an electrical shock.
Step 2: Remove the Old Motor
- Access the AC Unit: Remove the cover from the air conditioning unit on your RV’s roof. This might require the use of a screwdriver.
- Disconnect Electrical Connections: Carefully take a picture of the wiring or make a note of how your old motor is connected. Then, disconnect the wires from the old fan motor.
- Unscrew the Old Motor: Once the electrical connections are off, unscrew the old fan motor from its mounting bracket and remove it. This step is vital for making room for the new motor.
Step 3: Install the New Motor
- Position the New Motor: Align the high-performance RV AC fan motor with the mounting holes. Secure it in place with screws, ensuring it is tightly fastened but not overly tightened, which could damage the casing.
- Connect Electrical Wires: Refer back to the picture or notes you took earlier. Connect the wires to the new motor, following the same configuration as the old one.
- Capacitor Connection: Don’t forget to connect the new 7.5µF/370V capacitor—this step is essential for the motor’s effective operation.
Step 4: Final Checks and Power On
Once everything is connected, double-check your work and make sure all connections are secure. If everything looks good, replace the cover on your AC unit and restore power at the circuit breaker.
Step 5: Testing the New Setup
Now for the moment of truth! Turn on your RV’s AC unit and check that the fan operates as intended. Listen for smooth operation and observe the cooling performance; you should notice significant improvements thanks to your high-performance RV AC fan motor replacement!
Conclusion
And there you have it! With this step-by-step guide, you’ve not only replaced your RV AC fan motor but also upgraded your cooling capabilities. This motor’s reliable performance, dual-speed operation, and robust design are sure to enhance your RV experience. Remember, regular maintenance is key to prolonging the life of your appliances. I hope you feel empowered to tackle future projects with confidence!
Thank you for following along. If you need further assistance with appliance repairs, feel free to reach out or check out my other blogs. Your journey toward a comfortable and cool RV experience starts today!
Happy travels, everyone!
Meta Description
Optimize your RV’s cooling with a high-performance AC fan motor replacement. Step-by-step guide by Appliance Ace for seamless installation and efficiency.
Leave a Reply